You can create bookmarks and page labels in your PDF documents manually, or you can let Bluebeam create them automatically. The automatic bookmarking feature is a huge time saver for large drawing sets.
Table of Contents
- Create Page Labels Manually
- Create Page Labels Automatically
- Create Bookmarks Manually
- Create Bookmarks Automatically
- Organizing Bookmarks
Create Page Labels Manually
You can manually type in a page label if you have a small number of changes to make.
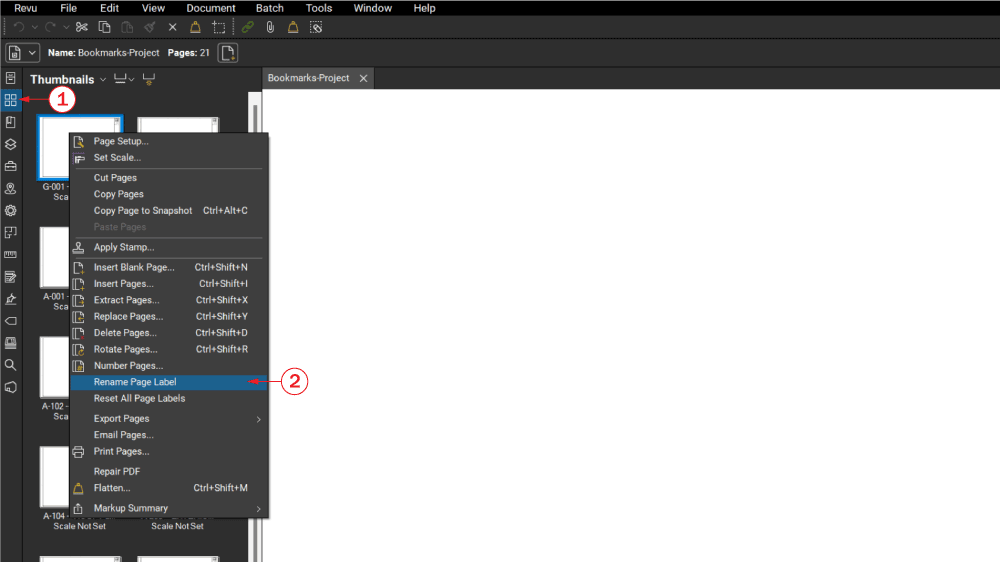
- In the left toolbar, select the Thumbnails panel.
- Right-click on the page with the label that will change and then select Rename Page Label.
- Type in your new page label and then press Enter.
Create Page Labels Automatically
It is much faster to have Bluebeam automatically create the page labels for you when you have a large document with a consistent title block.
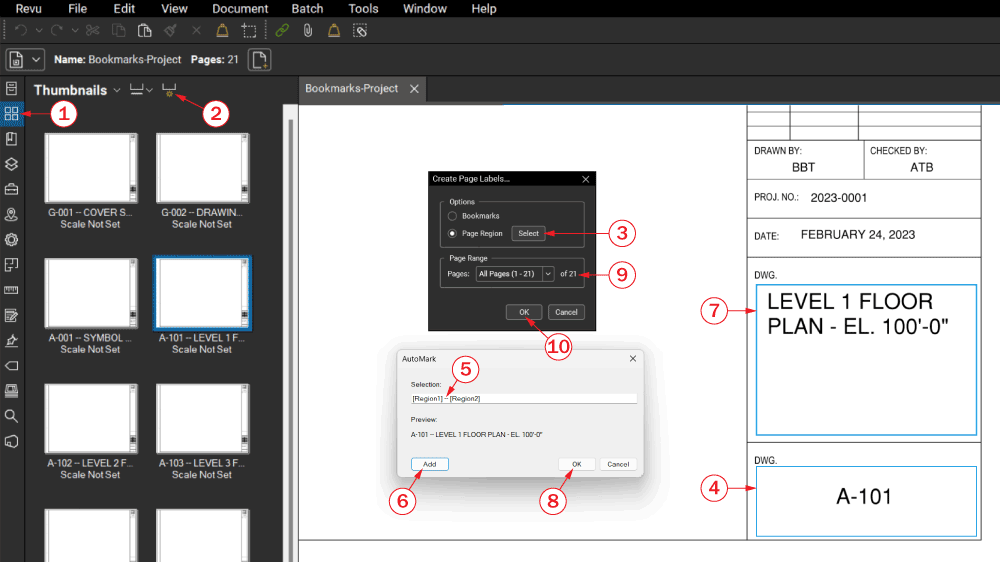
- Navigate to the Thumbnails panel in the left toolbar.
- Click on the Page Label icon with the yellow star below it. This opens the Create Page Labels... dialog.
- Click the Select button under page region since we need to tell Bluebeam where to pull the text from. This brings up a crosshair cursor so you can select a region.
- Draw a box for the zone that contains the text you want to use in your Page Label. In this case, I want to automatically insert the sheet number.
- Be sure to select the entire region where text may be on every sheet. Keep in mind that the text may be larger on other sheets.
- You can continue to add regions if you want to append other text. I want to do that so I will add some text to help separate the regions. In this example, I will add a space, two dashes, and another space.
- Click the Add button to insert the next region.
- Draw a box around the next area of text you want to automatically include.
- Be sure to select the entire region where text may be on every sheet. In this case, the sheet title may expand to fill the entire area so I draw the box larger than needed on this sheet.
- Repeat steps 5 through 7 until you are finished. The Preview gives you an idea of what you will end up with so you can fix mistakes. Once you are happy, click the OK button.
- Make sure you select the range you want this to apply to. All of my sheets have a consistent title block so I will select All Pages.
- Click OK and Bluebeam automatically adds Page Labels to every sheet in the file.
Create Bookmarks Manually
Creating manual bookmarks is very similar to creating page labels.
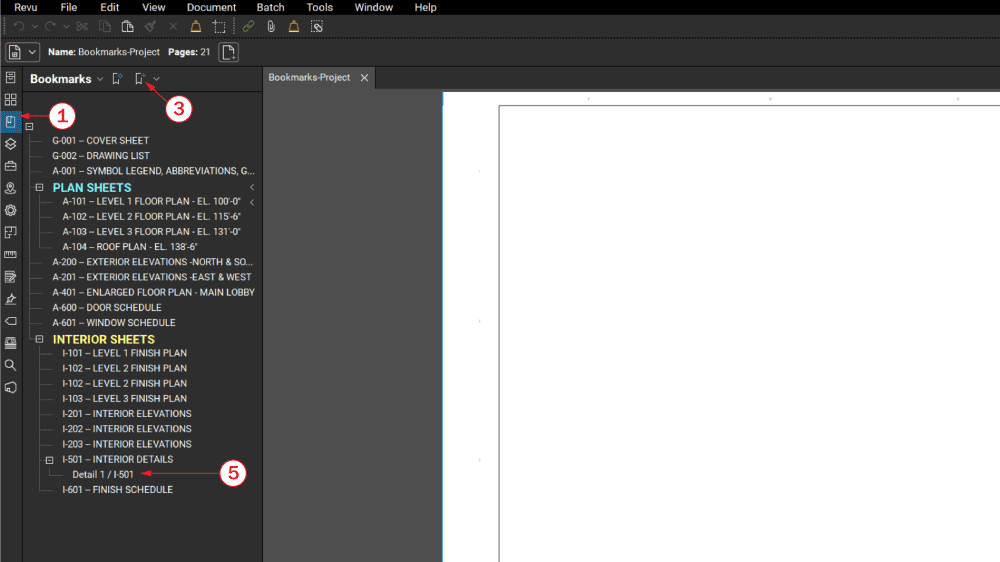
- Select the Bookmarks panel from the left toolbar.
- Navigate to the exact view you want to see on your screen when you click on a bookmark.
- In most cases, you should Zoom to full page because most people want to see the entire page when they click on a bookmark. However, you can zoom to any location on any page. I will get to that in a moment.
- Click on the Bookmark icon that has the blue plus.
- If you already have bookmarks, you can click the down arrow next to the icon to add a bookmark before or after the current bookmark.
- Type in the name of your bookmark.
- You can also create child bookmarks by dragging an existing bookmark so that it is nested below another bookmark.
- In this case, I zoomed in so that Detail 1 on sheet I-501 filled the entire screen. Then I created the bookmark, named it appropriately, and then dragged it so that it was nested under the main bookmark for sheet I-501.
Create Bookmarks Automatically
You may already have the hang of this, but now I will show you how to automatically create bookmarks.
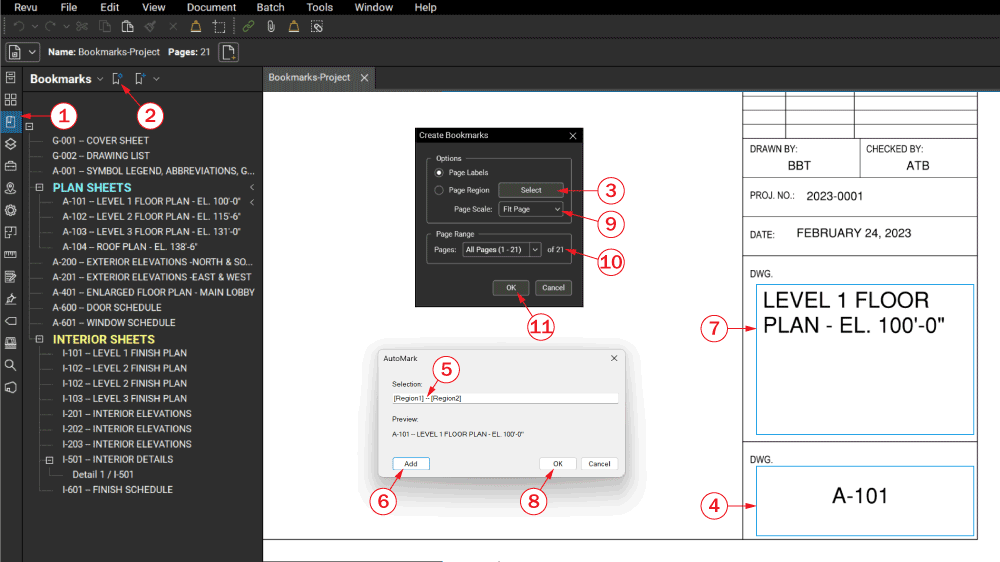
- Navigate to the Bookmarks panel in the left toolbar.
- Click on the Create Bookmarks icon with the blue star in the corner. This opens the Create Bookmarks dialog.
- Click the Select button under page region since we need to tell Bluebeam where to pull the text from. This brings up a crosshair cursor so you can select a region.
- Also note that you can select Page Labels if you have already created them and then click OK. Otherwise, continue to step four.
- Draw a box for the zone that contains the text you want to use in your Bookmark. In this case, I want to automatically insert the sheet number.
- Be sure to select the entire region where text may be on every sheet. Keep in mind that the text may be larger on other sheets.
- You can continue to add regions if you want to append other text. I want to do that so we will add some text to help separate the regions. In this case, I will add a space, two dashes, and another space to help make them easier to read.
- Click the Add button to insert the next region.
- Draw a box around the next area of text you want to automatically include.
- Be sure to select the entire region where text may be on every sheet. The sheet title may expand to fill the entire area so I draw a box larger than needed on this specific sheet.
- Repeat steps 5 through 7 until you are finished. The Preview gives you an idea of what you will end up with so you can fix mistakes. Once you are happy, click the OK button.
- Select the default Page Scale that you want each sheet to open to when the bookmark is clicked. For most cases, Fit Page is appropriate so that the entire sheet is visible.
- Make sure you select the range you want this to apply to. All of these sheets have a consistent title block so I will select All Pages.
- Click OK and Bluebeam automatically adds a bookmark for every sheet in the file.
Organizing Bookmarks
As I explained in the manual bookmarks section, you can nest bookmarks under each other. You can also color code them to make it easier to find what you need. The video above makes it easy to follow along, but here are some options to better organize bookmarks in your PDF.
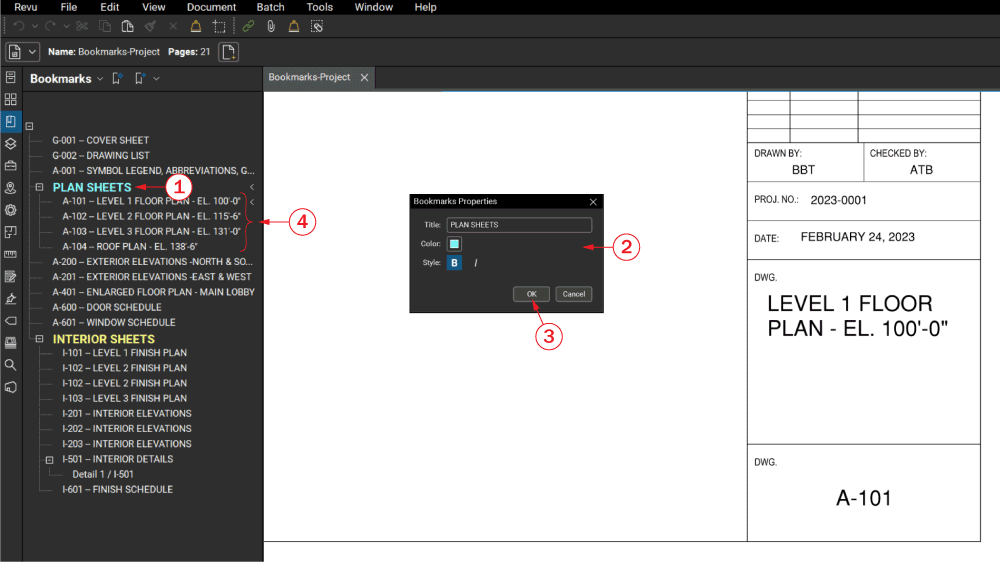
In the example above, I have a heading called PLAN SHEETS. This is just a regular manual bookmark to the first plan sheet in the set (A-101).
- You can easily edit a bookmark by right-clicking on it and then selecting Properties. This brings up the Bookmarks Properties dialog box.
- Now you can change the Title of the bookmark, change the color, and also make it bold and/or italics.
- Click OK and you can see the results in the bookmarks list.
- After setting up a heading bookmark like PLAN SHEETS, you can select all of the individual plan sheet bookmarks by clicking on the first plan sheet bookmark, holding shift, and then clicking on the last plan sheet bookmark. Then you can drag that group until you see the inset blue arrow that indicates these will become child bookmarks of PLAN SHEETS. Release the mouse button and you have set up a group of bookmarks that can be collapsed using the + or - buttons to the left of the heading.
Automatically Create Page Labels from Bookmarks or Bookmarks from Page Labels
This YouTube video explains how to automatically create Bookmarks from existing Page Labels. You can also create Page Labels from existing Bookmarks, but there is one thing to watch out for. Bluebeam is not able to create Page Labels from Bookmarks if the bookmarks are nested into sections.