Insert an Image
There are three ways to insert an image into a Bluebeam Revu PDF. Once you have it in the PDF, you can mark up the image and then copy that to paste into an email.
Table of Contents
- Inserting Images with the Bluebeam Image Tool
- Inserting Images with the Windows Snip & Sketch Tool
- Open an Image Directly in Bluebeam Revu
- Inserting Your Company Logo
- Adding Markups to a Photo
- Emailing A Marked Up Photo
Inserting Images with the Image Tool
The best way to insert an image is to use the Image Tool by typing the I key on your keyboard, clicking on the Image icon in the main Toolbar, or by clicking Tools > Markup > Image >From File.
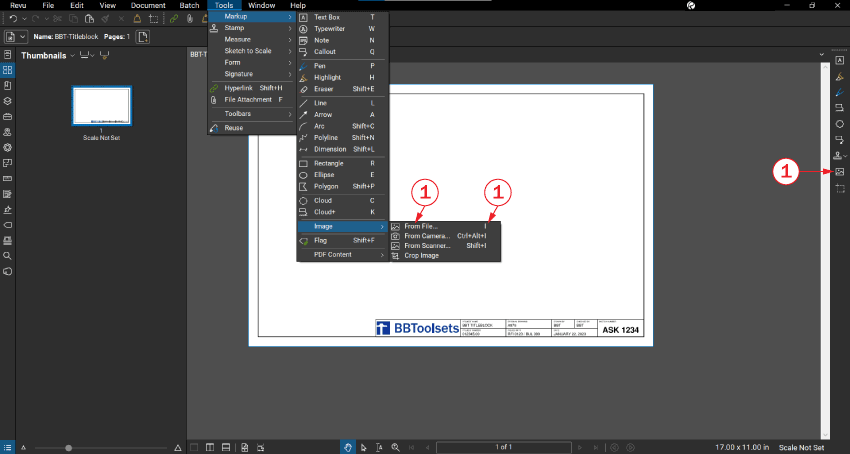
- Select the Image Tool using one of the three methods above.
- Select the file you want to insert and then click Open.
- Click and drag to size the image you want to insert. A preview will be generated as you drag. Release the mouse button when you have the image sized correctly.
Cropping an Image
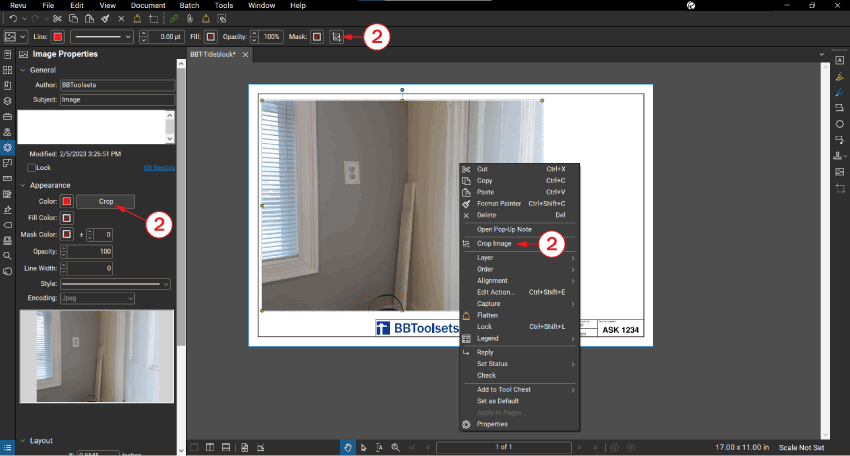
After the image is inserted as a markup, you can easily crop it.
- Select the image from inside your PDF.
- Select one of the crop options:
- Click the Crop button in the Image Properties toolbar.
- Click the Crop button in the top toolbar.
- Right-click and select Crop Image.
- Click and drag a box for the area of the image you want to keep.
Using Windows Snip & Sketch
The built-in Windows Snip & Sketch app allows you to quickly take a screen capture.
- Open your image. You can double-click it from File Explorer or open it in another app.
- Click the Windows key and then type Snip & Sketch. Click Open to open the app.
- Click New from inside the Snip & Sketch app.
- Draw a box for the area of the image you want to place into Bluebeam Revu. The image is copied into the Snip & Sketch program. It is also copied to your clipboard.
- Switch to your Bluebeam PDF, move your mouse to the bottom-left corner where you want the image, and then type Control-V to paste the image where your cursor is located. You may need to resize the image.
Open An Image Directly With Bluebeam
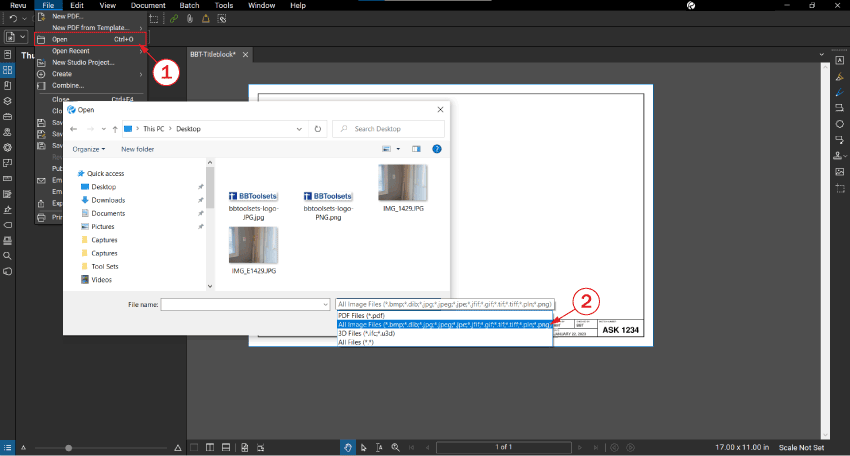
This isn't ideal, but you can open image files directly into Bluebeam and it converts the image into a PDF. The problem with this is you cannot adjust, crop, or move the image because it becomes the background of the PDF sheet.
- Click File and then click Open.
- Change the file type in the lower right of the dialog box to All Image Files.
- Select the image you want to convert to a PDF and then click Open.
A new PDF file is generated with a file name that matches the file name of the original image.
Inserting Your Company Logo
The process for inserting your logo into a PDF is the same as using the Image Tool above. However, image type is important. Ideally, you want to insert a PNG file since logos usually have only a few colors. PNG files work best because the file size is small and logos usually only have a couple of colors. Plus the logo image will be more crisp.
The best option is to export your logo file from a vector image editor (like Adobe Illustrator) to a PDF file. From there, you can open the PDF and use the Snapshot tool in Bluebeam to copy the logo, then paste it into a new file. This maintains the vector information and make for a perfectly crisp logo.
You can see a demonstration of this process in the YouTube video at the top of this page.
Adding Markups to a Photo
Once the image is in your PDF, you can add any type of markup that you normally use including symbols from the Tool Sets or just the standard Text and Leader markups.
Emailing a Marked Up Photo
Sending marked up photos in the body of an email is a great way to communicate to colleagues, engineers, or contractors. The easiest way to do this is to use the Windows Snip & Sketch tool mentioned above.
After the sketch is on your clipboard, you can change over to Outlook, Gmail, or any other email program and press Control-V to paste the image into the message.